Resources
Task Scheduler Configuration
The Syntelic application can utilize the Windows Task Scheduler program to automate certain recurring actions, including imports and notifications. In order to configure the task scheduler for these purposes, two Syntelic application programs must be installed on the application servers to facilitate the task scheduling process: SynLink and SynService.
SynLink is a program that is kicked off by Windows Task Manager in order to run Syntelic Batch actions at scheduled intervals. SynLink “calls” the SynService program and tells it to run the action specified in the Task Scheduler. SynService uses these parameters to initiate data imports that populate the Syntelic database.

STEP 1- INSTALL AND CONFIGURE SYNLINK
The SynLink application requires two files, both of which reside in the SyntelicSyntelic application files folder on your application servers.
| FILE | DESCRIPTION |
|---|---|
| SynLink.exe | The application program that initiates a SynService session. Ensure this file is present in the folder. |
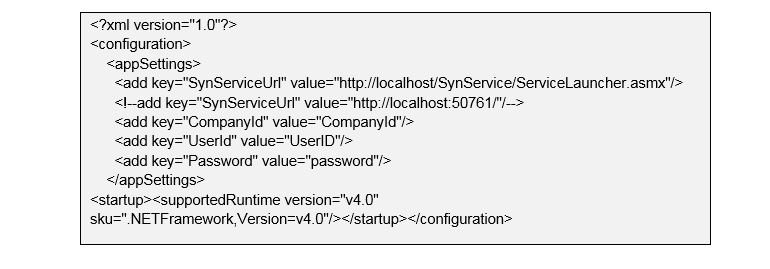
| SynLink.exe.config | The configuration file for Synlink.exe. This file contains the URL to initiate a SynService session and the program login parameters. (See sample below.) The SynLink.exe.config file can be edited using any standard text editor. |
Replace the appropriate values for the SynServiceUrl, CompanyId, UserId, and Password parameters in the file and save the edited version to its original location. SynLink.exe is initiated by the Task Scheduler process, so no further action is required. Each time SynLink executes a process, SynLink creates a log file on the application server in the SyntelicSyntelicLog folder.
STEP 2- INSTALL AND CONFIGURE SYNSERVICE
SynService is a webservice program that other programs, such as SynLink or Sysco’s PI application “call” to run Syntelic actions, making it unnecessary for a user to login to the application and run it from the interface.. The SynService program and configuration files reside in the SyntelicSynService folder.
The primary configuration file for SynService is the web.config file located in the SynService folder. Replace the appropriate values for the Connection String, UserID, and Password. The values for these parameters will mirror those configured for the web.config file in the SyntelicSyntelic folder.
STEP 3- CREATE SCHEDULED TASKS
To create a new scheduled task:
- Open the Windows Task Scheduler on the application server.
- Right click on Task Scheduler Library on the task Scheduler tree on the left side of the application window.
- Select “Create Task” and enter a task name.
- General tab – Select option “Run whether user is logged in or not”. Uncheck “Do not store password”.
- Triggers tab – Set your task frequency – for example, a daily task that starts at 1:00 AM.
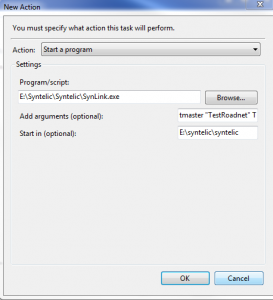
- Actions tab – Select “New”. The Action option is “Start a program”.
- The “Add Arguments” box contains the following parameters. For example:
ClientImports “TestLocationImport” Test
-
-
- The “Start In” folder path determines where the SynLink output log files are written to. When the task runs, it will create a logs folder.
-
- Conditions tab – leave all options unchecked.
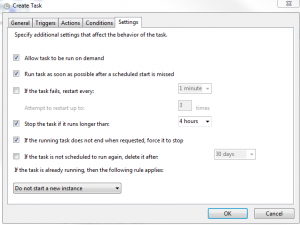
- Settings tab – Options should be set as shown on the screen shot below.
Ensure the service account for the application server has modify permission access for the “Syntelic” folder.


