Resources
Configuring Single Sign On
Single sign-on allows a user to access the Syntelic application using only the Active Directory credentials they already use to log on to a company’s network. Below is a list of steps for configuring the use of single sign-on in the Syntelic application. Configuration is completed by making changes in the Syntelic application, the web.config file, IIS, and the Internet Options of each individual user.
Syntelic Application Configuration
Before enabling single sign on, the new users must be added to the user table within Syntelic. The new Syntelic user ID will follow the convention of DomainName\\userID, where the new users Active Directory ID follows the Domain. A password will need to be set for these new users but it does not need to match the password associated with the Active Directory ID. The password will never actually be entered by the individual users.
Web.config Configuration
Step 1
After creating the new user IDs, locate the Syntelic application folder. Open the web.config file with a text editor such as Wordpad, Textpad, etc.
Step 2
Within the web.config file, locate the <system.web> tag . In between <system.web> and </system.web> insert:
- <authentication mode = “Windows” />
Step 3
Similar to the <system.web> tag you will next look for the <binding> tag. Be sure to find the inner pair of <binding> tags located inside the larger <bindings> tag. In between the opening and closing <binding> insert the following line:
- <httpTransport authenticationScheme= “IntegratedWindowsAuthentication” maxReceivedMessageSize=”2147483647” maxBufferSize=”2147483647” />
An existing line may also be altered to reflect the same message above. There should not be two instances of <httpTransport> in the web.config.
Step 4
The next tag that will need to be altered is the <appSettings> tag. Just like before between the opening and closing <appSettings> tag insert the following line:
- <add key=”WindowsAuthenticationEnabled” value=true” />
If the value is not set to true, single sign on will be disabled.
Step 5
For the final step in configuring the web.config, make sure that company is specified. Within the appSettings tags, the following line must exist:
- <add key=”LoginCompanyId” value=”x”/>
X represents your company ID.
Server IIS Configuration
On the server machine, navigate to Start and search for Internet Information Services (IIS) Manager. Once the manager is opened, expand Sites on the left hand side under Connections. Now click on Default Web Sites. In the middle of the screen under IIS, double click the icon that says Authentication.
Windows Authentication should be the only thing that is enabled. Everything else should be disabled.
Internet Explorer Configuration
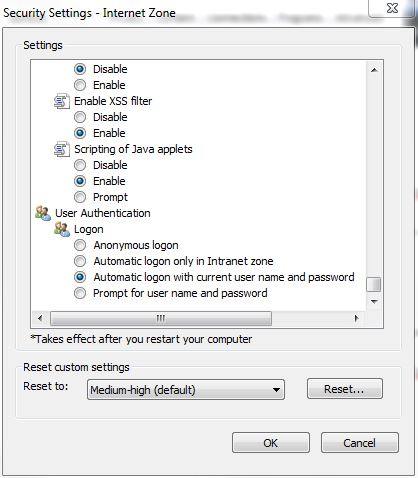
Each individual user will need to make a slight change to their internet options within Internet Explorer so that the credentials they use to log on to their computer is automatically read by the application. This can be done by going to Settings in the top right of Internet Explorer then clicking Internet Options. Once this is open, click on the security tab at the top. At the bottom of this page click the Custom Level button. Scroll down to the bottom where you will see User Authentication. Make sure that Automatic logon with current user name and password is selected and click ok.
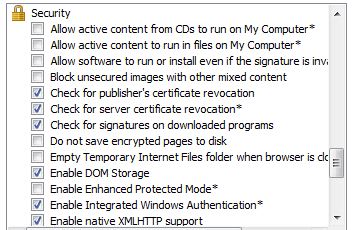
The user will also need to make a change under the Advanced tab of the Internet Options. Scroll down to Security under Settings and check Enable Integrated Windows Authentication. Once these settings are saved, the user should close their browser and restart their computer before trying to access the Syntelic application.


