Resources
Creating a New Dashboard
STEP 1 – CREATE A NEW ACTION
To create a new dashboard action, run the action view. Click the New Action toolbar icon in the upper right hand corner of the action view.
The Create New Action dialogue will appear. Select Dashboard as the action type, and click OK.
STEP 2 – SET THE PRIMARY TABLE
After selecting the action type, the Table drop-down menu will appear. Each dashboard must have a primary table parameter set. The primary table parameter determines the starting point used by the dashboard’s component actions for joining to the action that drills-down to the dashboard in question.
In many cases, you can choose a primary table that is the same as your source view (the report that will drill-down to your dashboard.) For example, if you would like to drill-down from a route level view to a dashboard containing a route stop view displaying all the stops for the selected routes, you would then set the primary table of your dashboard to route.
Click OK to continue configuring the new dashboard.
STEP 3 – CONFIGURE THE ACTION TAB
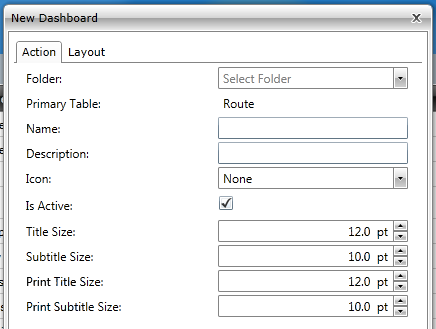
Once the primary table parameter is set, the New Dashboard dialogue window will appear. The Action tab will be selected.
To create the new dashboard, set the parameters of the Action tab as follows:
| PARAMETER NAME | DESCRIPTION | REQUIRED? |
|---|---|---|
| Folder | Choose the Folder associated with this action. | Y |
| Name | Name the new dashboard action. | Y |
| Description | Enter a description if desired. | N |
| Icon | Choose an icon if desired. | N |
| Is Active | Default setting is checked. Uncheck to deactivate. | N |
| Title/Subtitle SIze | Sets the font size for the dashboard name when displayed, and any subtitle information shown. | N |
| Print Title/Subtitle Size | Sets the font size for the dashboard name when printed, and any subtitle information shown. | N |
STEP 4 – CONFIGURE THE LAYOUT TAB
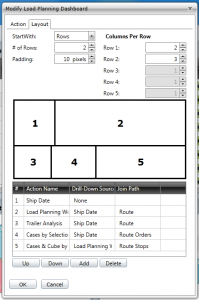
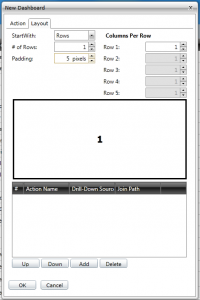
Once you have set the parameters of the Action tab, the layout must be configured. The Layout tab controls which dashboard components are displayed on the dashboard and how they are arranged.
Setting Up Rows and Columns
Before adding any component actions to the dashboard, the desired layout must be set.
| PARAMETER NAME | DESCRIPTION | REQUIRED? |
|---|---|---|
| StartWith | This parameter can be set to either Rows or Columns, and determines the primary orientation of the dashboard. | Y |
| # of Rows / # of Columns | Choose the number of Rows or Columns on the dashboard based on the StartWith parameter. | Y |
| Columns Per Row / Rows Per Column | Choose the number of columns per row or rows per column based on the StartWith parameter. | Y |
| Padding | Sets the number of pixels surrounding each component action when displayed. | Y |
Tabbed Dashboard Windows
Tabbed dashboard windows allow the user to access additional components quickly and maximize the available real-estate of the dashboard.
To add a tabbed window to the dashboard layout, right-click over the desired window number, then click Add Tab. Tabs are shown as a window number range. To remove a tabbed window, right click on the number range and select Remove Tab.
Sizing the Action Windows
To set the desired size for each component action, simply drag the black window outlines for each action to their desired proportions. This can also be done using the dashboard toolbar icons after the new dashboard is saved.
Adding Dashboard Actions
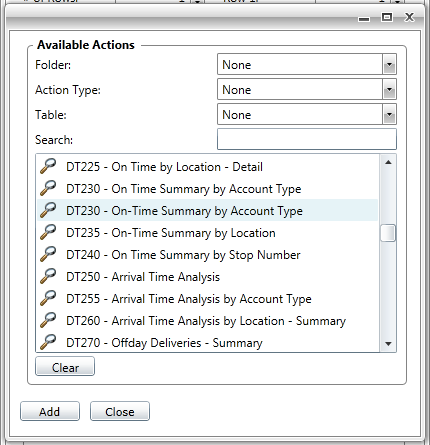
Once the layout of the dashboard is configured, actions must now be added. To add component actions to the dashboard, click the Add button. The Available Actions dialogue will appear.
Search for the desired action using the Folder, Action Type, or Table drop-downs, or simply type the action name into the Search box. Once found, highlight the action and click Add.
Each component action window configured for the layout of the dashboard is numbered. The component action will appear assigned to the lowest available window number.
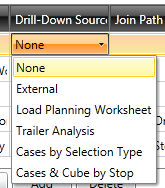
Once the action has been added, the Drill-Down Source must be set.
The drill-down source determines how the data for the action is populated in one of three ways:
| DRILL-DOWN SOURCE | DESCRIPTION |
|---|---|
| None | When selecting none, the data is populated by acting as an independent view. This populates the action with all data available based on the configuration of the component action only – including date range and any filters applied. The dashboard component will not be affected even when drilling-down from another source view. For example, highlighting a single route on a route view, then drilling down to a dashboard containing a route stop view, will show all stops that can be displayed based on date range and filters, regardless of whether they were displayed on the source route view. |
| External | Selecting External means that the data is populated by drilling down to the dashboard (and therefore the component action) from another source view. For example, highlighting a single route on a route view, then drilling down to a dashboard containing a route stop view, will show only the stops for the highlighted route on the source view. |
| Another Component Action | Data is populated by creating a parent-child relationship between two component views on the same dashboard. For example, selecting a route stop view as the drill-down source for a route order view on the same dashboard will initially display the route order view as blank. A message will say “Waiting on Drill-Down Source” until one or more route stops are highlighted on the stop view. Doing so will populate the route order view with only the orders associated with the highlighted stops. |
Once the Drill-Down Source has been set, the Join Path will automatically populate.
Arranging Dashboard Actions
Dashboard actions are arranged by moving the component up or down the list until assigned to the appropriate window number. To do so, highlight the action name, then click the Up or Down buttons as needed.
Removing Dashboard Actions
If all window numbers currently have assigned actions, additional components cannot be added to the dashboard without first removing existing actions or creating additional windows. To remove existing actions, highlight the action and click the Delete button.
To create additional windows, increase the # of Rows / # of Columns parameter or the Columns Per Row / Rows Per Column parameter. Windows can also be removed from the dashboard by adjusting these same parameters.


